4.1 Roles
Operators assign roles to people when those people are first added to MyID, but these roles can be changed later, usually without needing to reissue credentials. One person can be allocated multiple roles, which reduces the number of individual roles you need to maintain.
A number of roles are already defined and are available for use when MyID is installed. Depending on the configuration of your MyID system, you may have a different set. You can view the workflows accessible to each of these roles in the Edit Roles workflow – not all roles are displayed when you access this workflow.
For example:
- Cardholder
- Manager
- Security Chief
- Personnel
- Help Desk
- Startup User
- Device Account
- Unlock User
- Password User
- System
Warning: System and Startup User must not be allocated to end users. They are used for system administration and updates to the product may add operations to these roles. You must ensure that the ability to assign these roles to individuals is carefully controlled
You can make changes to the workflows accessible to the different roles or add new roles to the default set using the Edit Roles workflow.
You can:
-
Change existing roles
-
Add new roles
-
Delete roles
4.1.1 Change an existing role
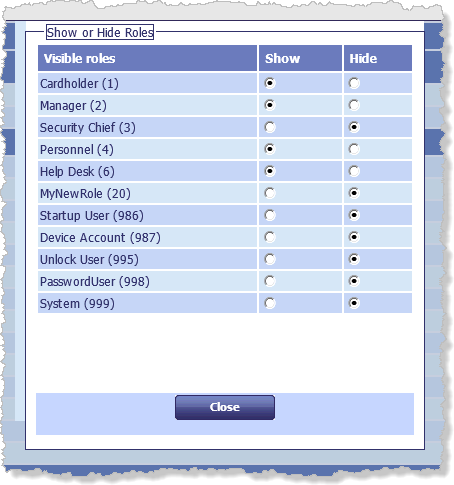
A subset of available roles is visible when you start the Edit Roles workflow. If the one you want to change is currently hidden, you must make it visible before you can make any changes. You may also want to hide some of the visible roles that you are not currently working on.
Note: Your choice of whether a role is visible or hidden is not saved.
-
From the Configuration category, select the Edit Roles workflow.
You can also launch this workflow from the Configuration Settings section of the More category in the MyID Operator Client. See the Using Configuration Settings workflows section in the MyID Operator Client guide for details.
-
If necessary, use the Show/Hide Roles button in the bottom left corner of the page to open the Show or Hide Roles box at the top of the page.

Select which roles to Show and which to Hide, and then click Close.
Note: Do not click Save Changes. If you do, the page is refreshed and the default Show and Hide settings are used to set the display.
-
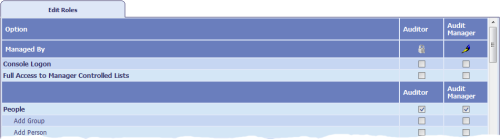
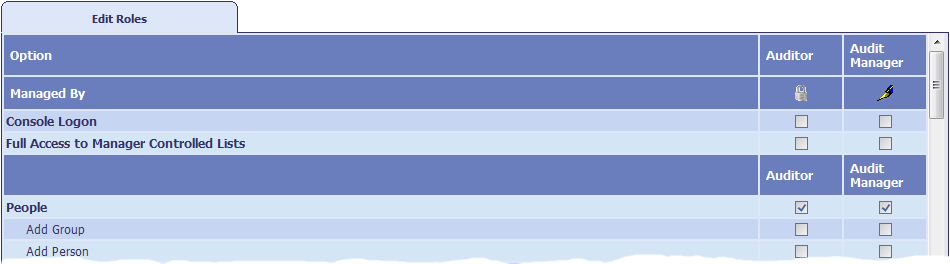
Locate the column heading of the role you want to change.
- The Full Access to Manager Controlled Lists option is reserved for future use.
- If a workflow is selected, it appears in the list of workflows available to people assigned that role when they access MyID.
- If a workflow box is cleared, it is not included in the list of workflows.
This selection works by deciding what to include; it does not exclude. If an individual is allocated more than one role, the combined set of included workflows is available to that person and each workflow is present only once.
Note: Some workflows contain two parts. If there is a workflow with the same name with Part 2 appended to it, you must select both workflows.
Note: Some workflows have sub-options indented beneath them; for example, View User Audit and View Full Audit. Selecting and deselecting sub-options does not affect the category-level checkbox; for example, it is possible to select View Full Audit and deselect the Reporting category – in this case, no Reporting workflows will be available to the user. If you have any sub-options selected, make sure the category-level option is also selected; you may need to select the parent option for the sub-option if no other workflows in that category are selected.
Note: If you hover your mouse over the workflow name, MyID displays a tooltip that lists which clients can use the workflow.
If you make a mistake, click Reset to revert to the settings that were last saved.
- Click Save Changes to save any changes. The workflow finishes and you must start it again to make any more changes.
4.1.1.1 Available workflows
The master list of workflows in the Edit Roles workflow may contain workflows that are not available for your clients. You can hover your mouse over the workflow name to display a tooltip that lists which clients can use the workflow.
In addition, the following MyID Desktop workflows are not available in any legacy web‑based clients:
- Assisted Activation
- Batch Collect Card
- Bio Unlock My Card
- Cancel Credential
- Cancel Device Identity
- Collect Card
- Erase Card
- Print Card
- Reset Card PIN
- Unlock Credential
Also, the following Desktop Client (Web UI) workflow is not available in MyID Desktop – it has been replaced by the MyID Desktop workflow with the same name:
- Assisted Activation
4.1.2 Add a role
-
From the Configuration category, select the Edit Roles workflow.
You can also launch this workflow from the Configuration Settings section of the More category in the MyID Operator Client. See the Using Configuration Settings workflows section in the MyID Operator Client guide for details.
-
Click Add at the bottom of the page. The Add Roles box opens.

- Enter a name for the role in Add Role called.
-
In Derived from, select the access level that you want to be used as the basis for your new role.
In addition to all existing roles, you can also choose from:
- Allow None – no access is granted to any workflow (this is the default).
- Allow All – access is granted to every workflow.
- Click Add. Your new role is displayed to the right of the list of existing roles.
- Change the workflow access available to the new role by selecting or clearing the boxes for each of the workflows.
- Click Save Changes to save the new role and its associated workflow access.
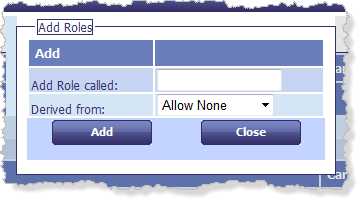
Note: You can add a maximum of 100 custom roles to the system. The standard MyID system roles do not count towards this total.
4.1.3 Delete a role
-
From the Configuration category, select the Edit Roles workflow.
You can also launch this workflow from the Configuration Settings section of the More category in the MyID Operator Client. See the Using Configuration Settings workflows section in the MyID Operator Client guide for details.
- Click Delete at the bottom of the page. The Delete Roles box opens.
- Select the role you want to delete from the list in Delete a Role.
-
Click Delete.
You are prompted to confirm your action and are reminded that you must transfer people who had been allocated this role to another role.
-
A box called Transfer Users opens.
Anyone who was allocated the deleted role is allocated to another role. You must select the role to be used.
Note: You must still select a replacement role even if there are no users currently using the role you are deleting.
- Click Close to close the box and complete the transfer.
4.1.4 Controlling the assigning of roles
Roles are assigned to people when their accounts are created or edited. Unless you specify the roles that an individual must have to assign a particular role to someone else, anyone could assign any role. For example, you may specify that someone must have either the System role or the Security Officer role to be able to assign the Help Desk role to other users.
To set the roles that can manage (assign) a role:
-
Click the icon in the Managed By row, immediately below the role name.
The icon indicates whether the role already has any management restrictions:
 The role can be managed by any roles.
 The role has a restricted list of roles that can manage it.
 -
In the box that opens, specify which roles can assign this role to someone.
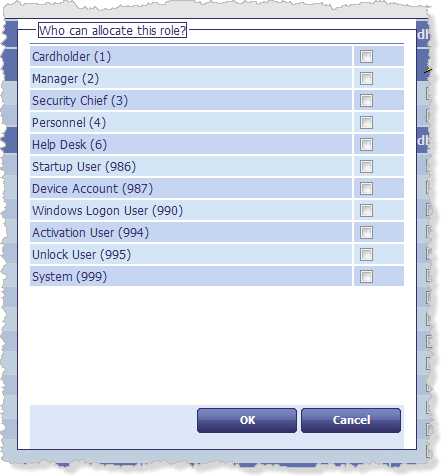
Note: If you leave all the options unselected, this means the role you are editing can be managed by any role.
- Click OK.
- Click Save Changes.

Note: If a role is set as a manager for another role, you cannot delete the managing role without first removing the link between the roles. If you attempt to delete a role, you will see a message similar to:
The following roles are currently managed by the Audit Manager role:AuditorThis role cannot be deleted at this time.
Note: Default group roles can override any managed roles you have set up; see section 4.3, Default roles for more information about default roles.
4.1.5 Assigning logon mechanisms
You must specify the logon mechanisms for each role. If a user has multiple roles, this allows you to provide a different set of workflows depending on their method of logging in; for example, you can restrict the workflows available when a user is logged on using security phrases, and provide a full set when the user is logged on with a smart card.
Note: The PasswordUser role is not available for selection when assigning roles; instead, it is automatically used by MyID to provide access to workflows when a user is logged on to MyID using security phrases.
The logon mechanisms that you can use depend on which options you have selected on the Logon Mechanisms page of the Security Settings workflow; see section 3, Logon mechanisms for details.
To specify logon mechanisms:
-
From the Configuration category, select Edit Roles.
You can also launch this workflow from the Configuration Settings section of the More category in the MyID Operator Client. See the Using Configuration Settings workflows section in the MyID Operator Client guide for details.
- Click Logon Methods at the bottom of the page.
-
In the Logon Mechanisms box, select the logon mechanism you want to use for each role.

- Password is used for security phrase logon. See section 3.3, Logon using security phrases.
- Smart Card is used for smart card logon. See section 3.2, Logon using a smart card and PIN.
- Windows Logon is used for Integrated Windows Logon. See section 3.5, Integrated Windows Logon.
- Biometric Logon is currently used only for resetting PINs. See the Self-service PIN reset authentication section in the Operator's Guide.
- Client Credentials OAuth2 is
- Windows Hello is used for Windows Hello for Business.
- Click OK.
- Click Save Changes to close the Edit Roles workflow.
